Pilates for Triathletes Bike Part I: Pelvic Position for Cycling

This post applies to anyone who rides a bike. From the casual rider to the elite triathlete, one of the most important principles to master is a comfortable pelvic position on the bike. It should not feel effortful, but the pelvic should gently tilt posterior so the ischial tuberosities (sit bones) are in contact with the seat. This requires back length and core stabilization. Without this position, the legs are not set up to “move from the core,” resulting in decreased power transfer to the legs and discomfort. Translation: pelvic position dictates low back comfort and bike speed. Whether you’re trying to ride faster than your 12 year old up the hill or race in an Ironman, pelvic position is key.
What is the optimal pelvic position for cycling?
It is an active posterior pelvic tilt (PPT). I use the word “active” because it requires core activation to achieve this position. In addition, the lumbar and thoracic (low and mid-back) tissue must be lengthened for the pelvis to tilt comfortably.
A few questions to ask yourself…
- Do you ever have low back pain during or after riding?
- Do you feel any bouncing in the seat?
- Is it difficult for you to activate your core while riding?
- When you increase the resistance or power output, does your back hurt?
If any of these questions elicited “yes”, you may not have the correct pelvic position and core activation on the bike.
Here are two photos of professional triathletes. Which back position looks more comfortable?

Photo A
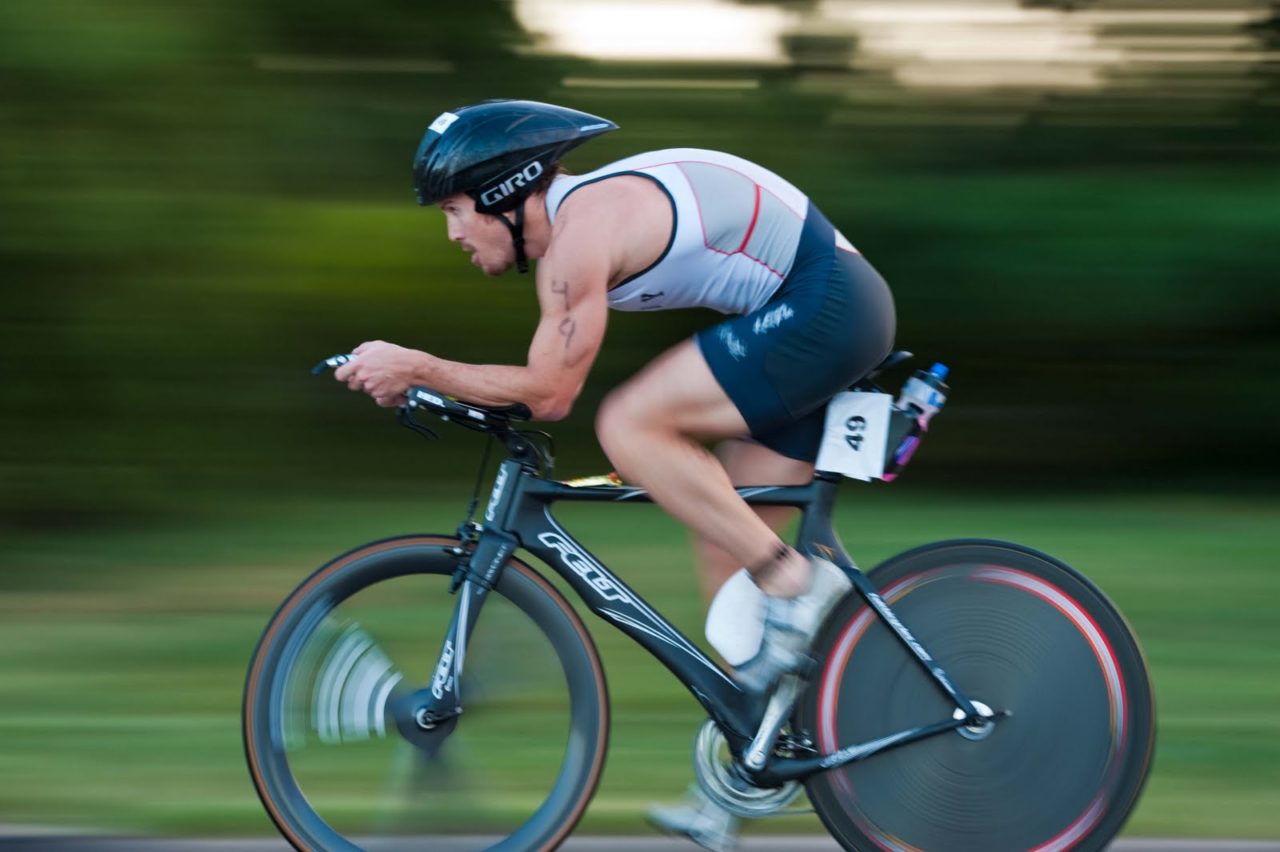
Photo B
Yes, Photo A. This athlete is demonstrating an active PPT while maintaining a long “C” curve along the entire spine. This “C” curve allows for appropriate tissue length and optimal core activation. The athlete in Photo B is also in a PPT, but it is being driven by the excessive rounding in the thoracic spine and not the activation of the core. Now, this is me just being picky…they would both smoke me within 10 seconds of riding!
Lower Cross Syndrome: Is this inhibiting your active PPT?
In the first post of this series, Pilates for Triathletes: Swim Part I, the work of Vladmir Janda and Upper Cross Syndrome was discussed. Well, if there’s an Upper Cross Syndrome there must be a Lower Cross Syndrome, right? Right! Janda was a physician in Czechoslovakia who discovered that certain muscles respond to abnormal stress by tightening and others by weakening. Most of us have Lower Cross Syndrome from the excessive sitting and slouched posture all day at work. Don’t worry, you can fix it!
Take a look at the picture below. Notice the muscles that are weak: abdominals and gluteus maximus. What are two key muscles for cycling? The abdominals and gluteus maximus. What are two areas that cyclists usually crave to stretch when they get off the bike? The low back and hip flexors. So, this makes sense. The brilliance of Pilates is that it addresses these imbalances with interesting, fun and challenging movement.
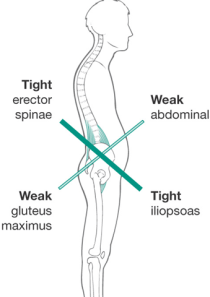
Lower Cross Syndrome
Before I show you a video of some of the Reformer exercises I use, this is initial homework I prescribe to my patients and athletes to help them discover their active PPT. Most of us want to round into our thoracic spine and forget about the lower portion.
 Step 1: Core stabilization
- Lay on your back
- Bend your knees with feet flat on floor
- Find neutral pelvis so hip bones are parallel with floor
- Place first two fingers on the inside of your hip bones and draw the belly in
Feel for muscles to “poke” into your fingers; those muscles are the transverse abdominis and internal oblique activating for stability
Step 2: Core stabilization with PPT
- Using core stabilization, gently press or tilt your low back into the floor
- Watch for the core to stay “scooped in” and not bulge out
- Feel for the deep abdominal sensation
- Notice the slight stretch occurring in your low back
- Repeat 5-10 times
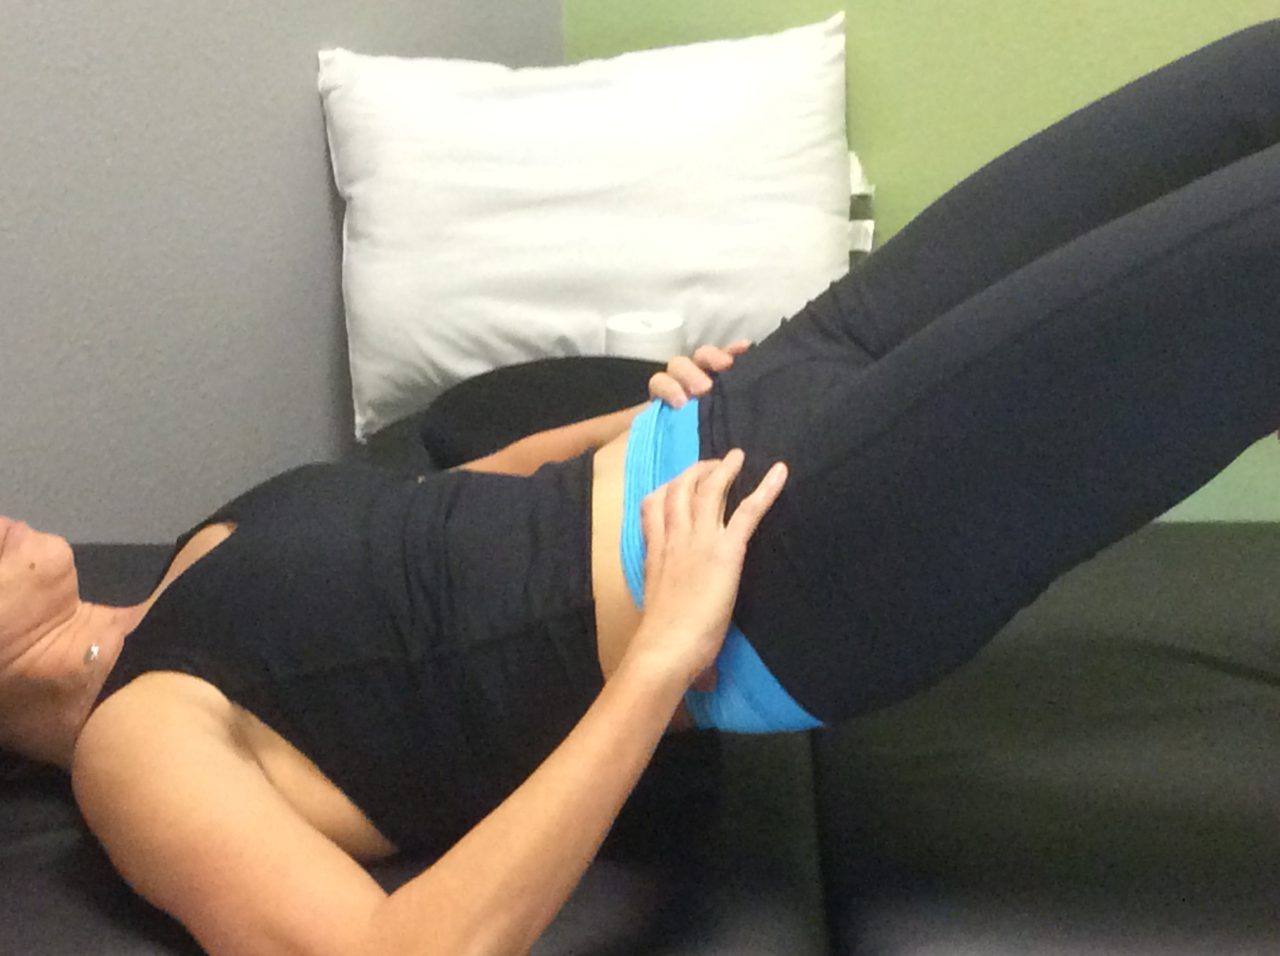 Step 3: Core stabilization with PPT with Pilates Bridging
- “Snake through the Spine” is the cue I give my patients when they are first learning Pilates Bridging
- Engage your core and gently press your low back into the floor
- Continue the movement by lifting the glutes and peeling the spine off the floor
- Come to rest the shoulder blades
- Paste the spine down, vertebrae by vertebrae and top to bottom, having the tail bone be the very last bone to hit the floor
- If you use the core to actively move the spine, you will feel a nice stretch on the way down
- Repeat 5-10 times
The following video shows a few of the Reformer exercises I use for my cyclists and triathletes. The video starts with short spine massage for back length, then moves to a hip flexor stretch that feels amazing, progresses to stomach massage to teach the “C” curve and ends with short box for an active PPT in a greater range of motion.
© 2018 and Beyond. ALL BLOG CONTENT at duncansportspt.com by Lori Duncan PT
ABOUT THE AUTHOR
 Lori Duncan, DPT, MTC, CPT is a respected Physical Therapist, Manual Therapist and Pilates instructor in Lafayette, CO. Lori is passionate about preventive physical therapy and education and is a nationally recognized presenter. She can be reached at [email protected]. You can also follow Duncan Sports Therapy + Wellness on Facebook & Instagram for more free tips and information.
Great information.